


Jaheiras Witness
-
Posts
195 -
Joined
-
Last visited
-
Days Won
3
Content Type
Profiles
Forums
Blogs
Posts posted by Jaheiras Witness
-
-
@semiticgod: positioning makes a huge difference and is one of those factors that lets you climb the difficulty levels. In a way you have to lose the BG instinct. In BG you would never block yourself in; with no flanking, no engagement and the ability to run away, you would always want to leave yourself an escape route. But in PoE jamming yourself into a corner with no escape route ia often the safest option, as weird as it sounds, if it stops you being encircled.
In terms of how much difference it makes, take the above battle I fought against the xaurips. If I had ignored positioning entirely and casually stood in the middle of the camp and let myself be surrounded, my run would now be over and that is no exaggeration. The xaurip skirmisher’s paralyse would be a death sentence with 5 or 6 xaurips, including champions, all auto-hitting me. I got paralysed approximately 10 times in the battle I fought (some were 2.4 sec grazes, others were 4.8 sec hits)...if I had been surrounded I wouldn’t have made it past the second paralyse effect. As it actually played out, with only the skirmisher and priest jabbing at me, the paralyses were an inconvenience but never life-threatening. So the difference something as simple as positioning makes is like night and day.
With regard to interrupt and concentration, they are generally insignificant for party play but are a huge part of the solo game. While a single interrupt does little, being interrupted constantly makes you unable to do anything, as if you were stunned. Interrupt requires you to start your action again; so not only do you have the momentary impact of the interruption, you also lose whatever time you had already invested in the action. So imagine being interrupted 2 seconds into a 3 second action, with a 0.5 interrupt value. That has cost you 2.5 seconds. Now imagine this happening 2 or 3 times in a row...that’s what I mean by interrupt-lock, it can be devastating. Generally it happens when you have multiple opponents or opponents with fast attacks all engaging you; and that’s what makes guls dangerous.
You absolutely can create characters built around Interrupt as an offensive action: you need high PER, the Interrupting Blows talent, and fast attacks (e.g. dual wielding) preferably with a weapon that can disable on crits. When such a character gets stuck into an opponent, that opponent can be considered neutralised. But only really useful against single targets or small groups, not against mobs.
-
 4
4
-
-
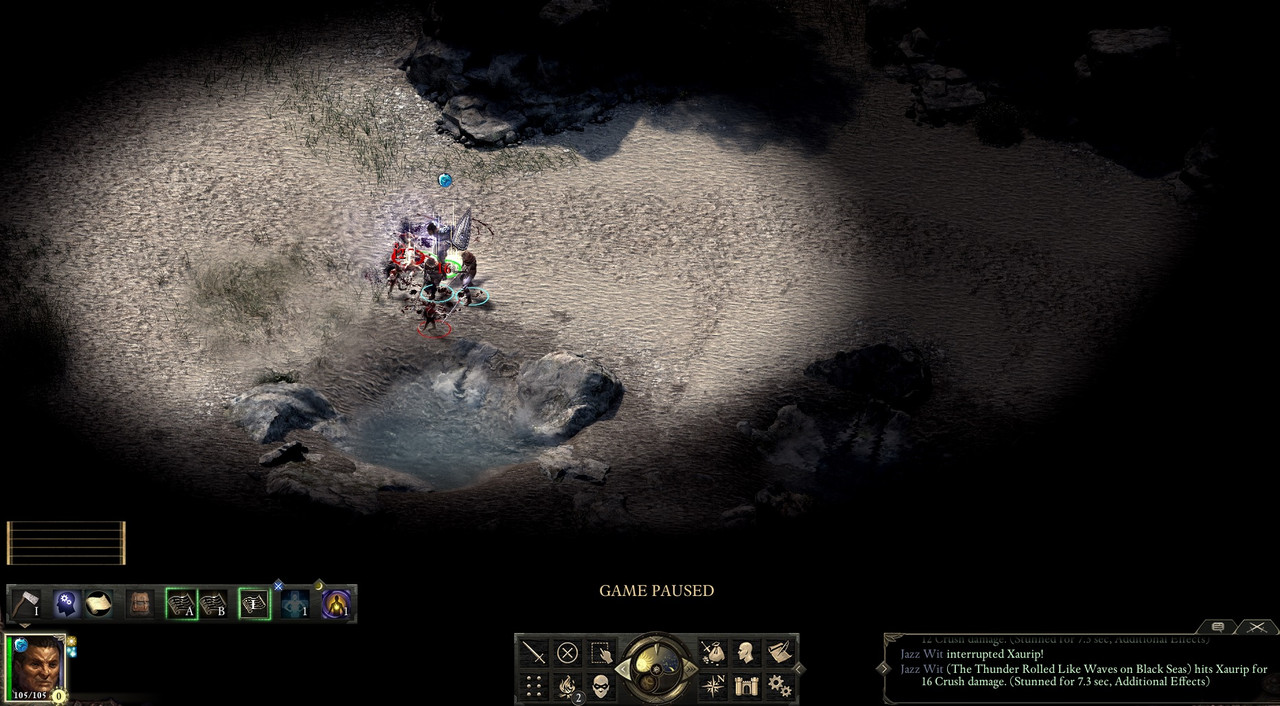
Jazz Wit, Solo Coastal Aumaua Chanter (Hard), Part 4
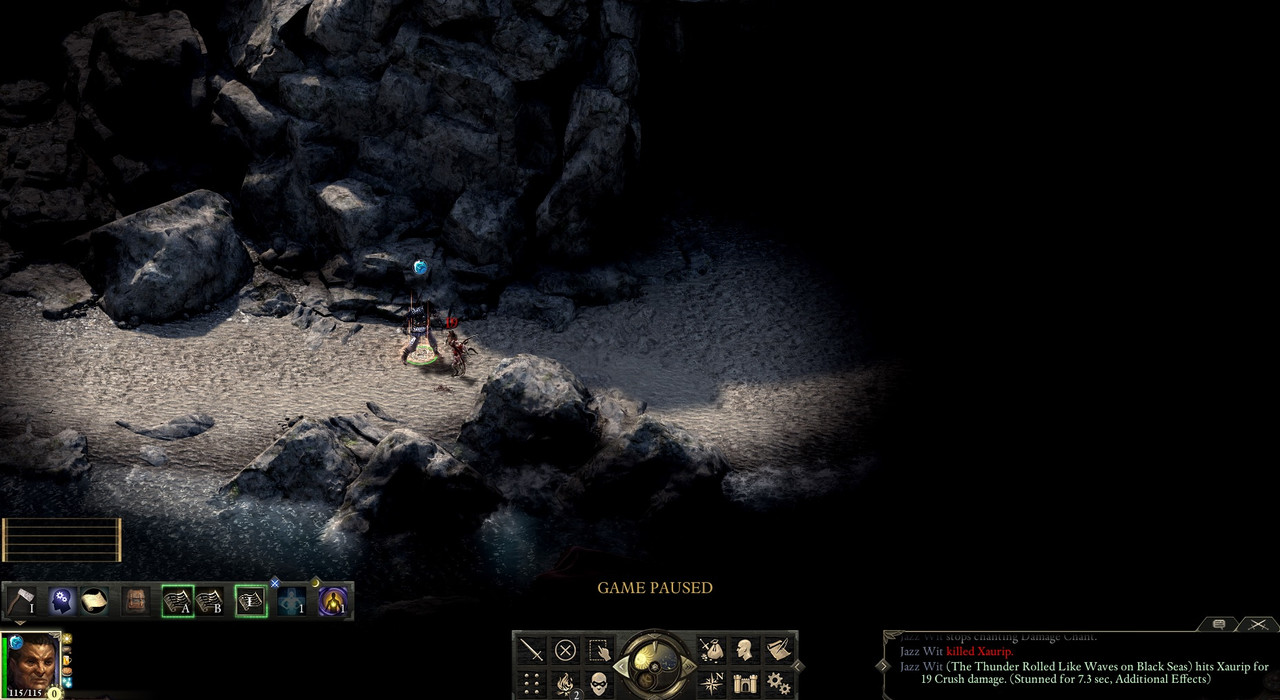
Some minor adventures to report tonight. Went to Anslog's Compass for Aufra's quest and decided to unleash 'The Thunder Rolled' for pure style points

I meet the deadfire merchant but for this run I have decided not to use any of the items he sells (since they are quite overpowered in relation to other equipment I can get). The belt is the big miss, even though this build is not exactly suited to wielding Firebrand, the other powers and stat boosts are so nice

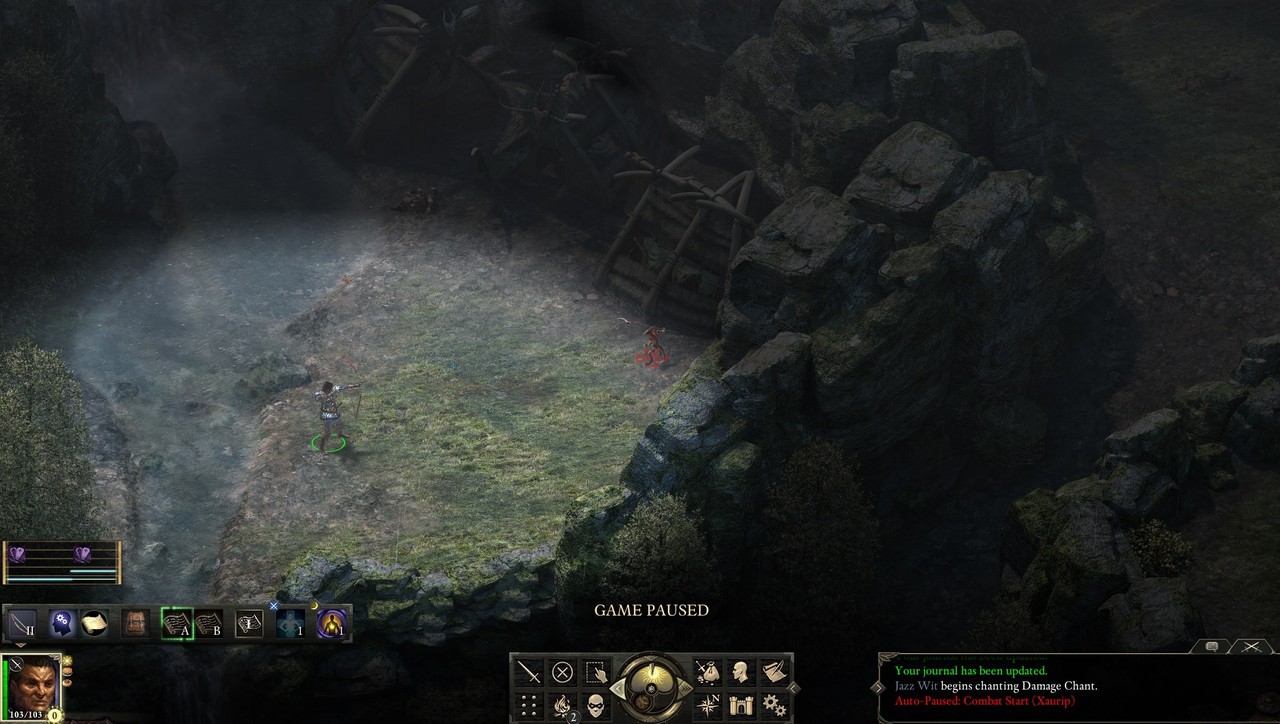
Found a good defensive spot for the main xaurip fight where I could not be surrounded, but 16.5 seconds of frightened

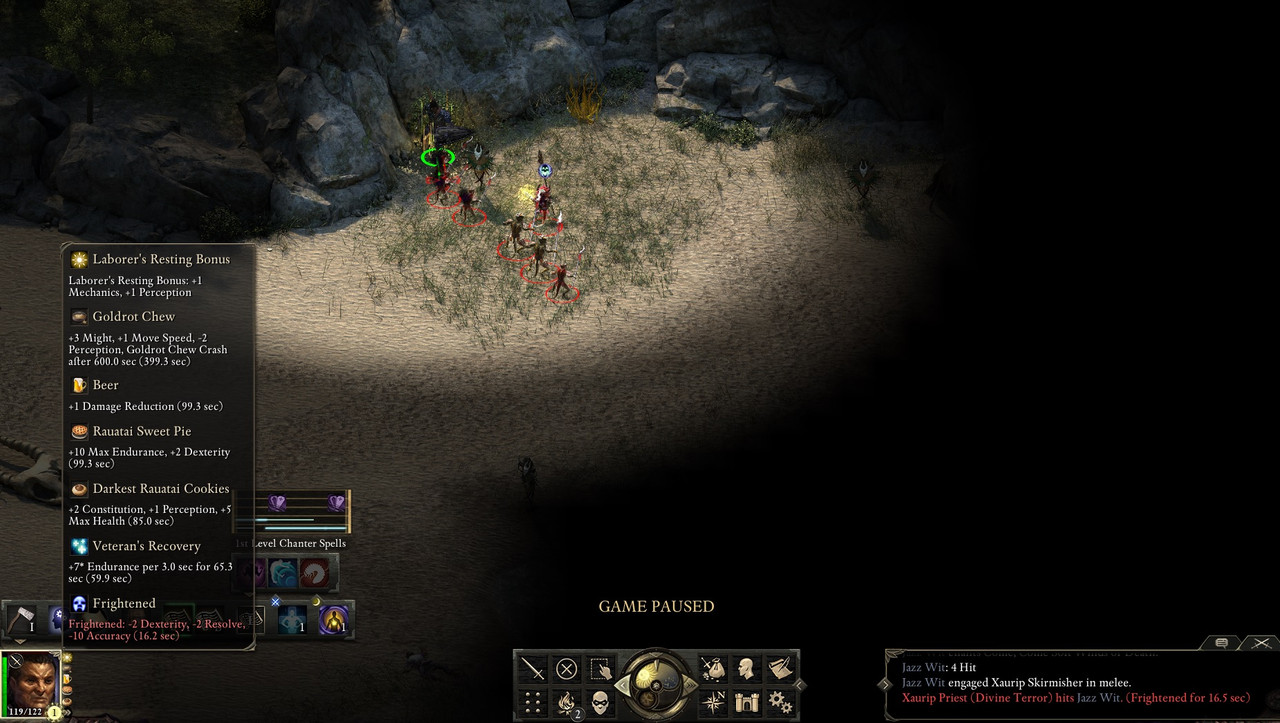
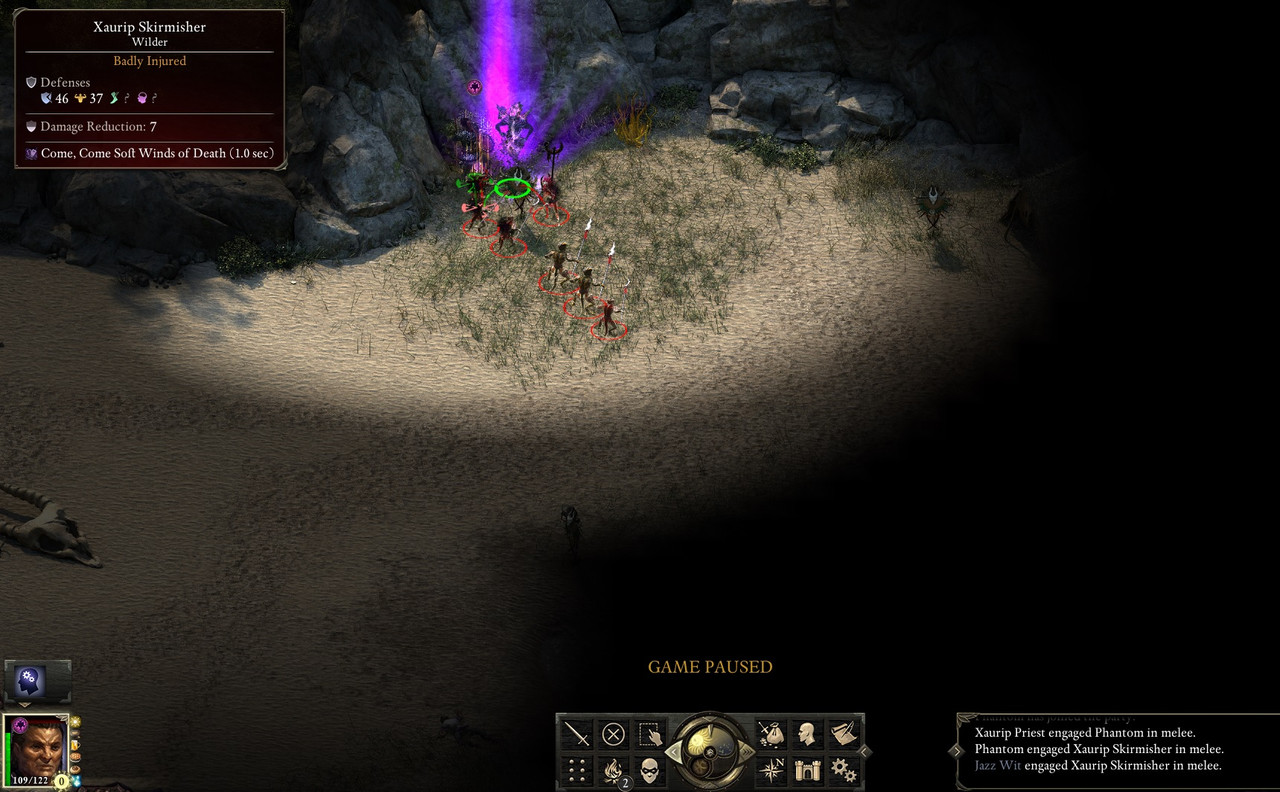
The hardest bit of this fight was to avoid paralysation from the xaurip skirmisher long enough to get 3 phrases chanted. Every successful paralyse stopped my chant, I needed the xaurip to fail in its paralysis roll 2 times to get 1 phrase through. My FOR is good but you can see from below screenshot that the xaurip skirmisher was already badly injured (from Soft Winds) before I managed to summon the phantom.
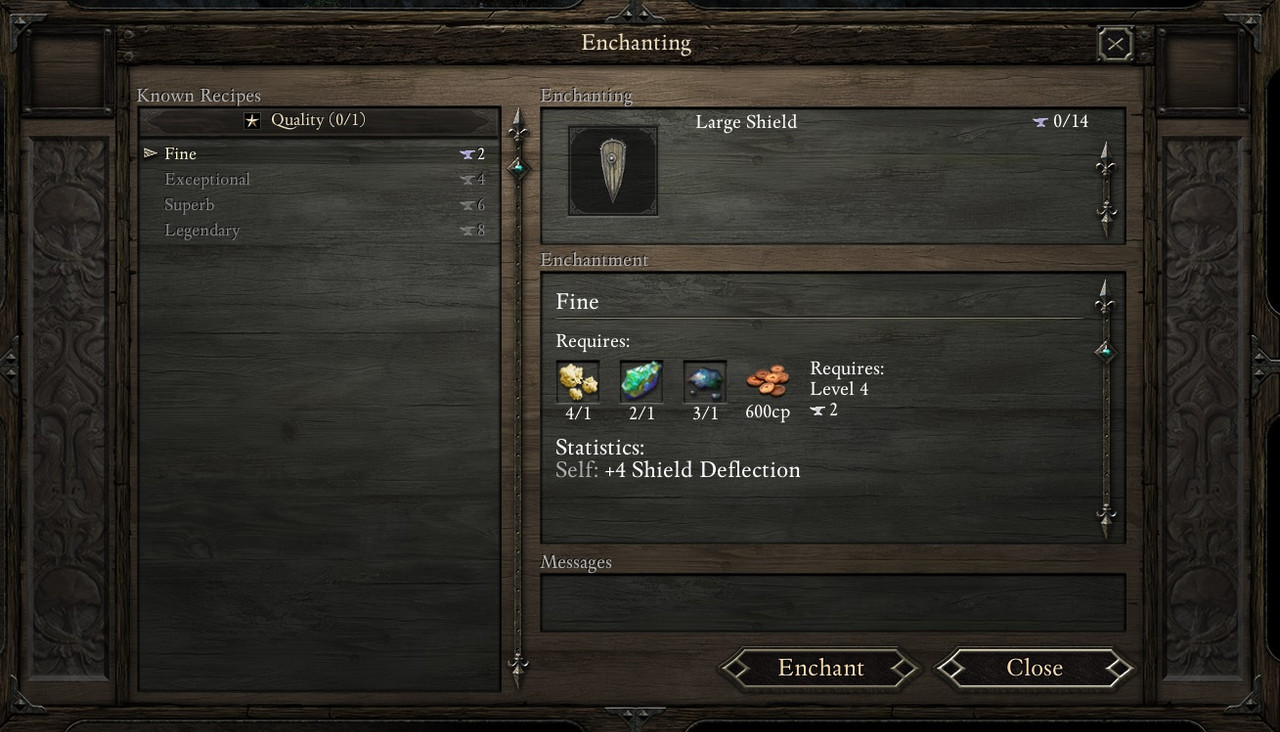
Can finally upgrade my shield:
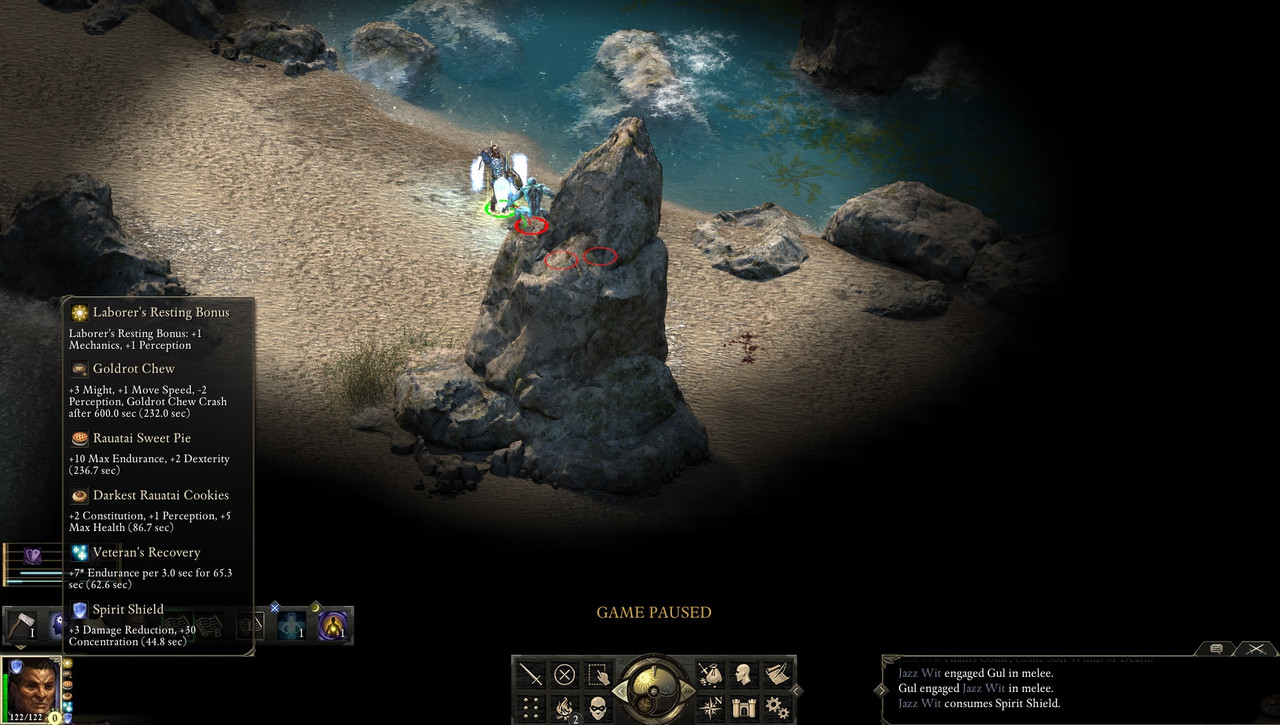
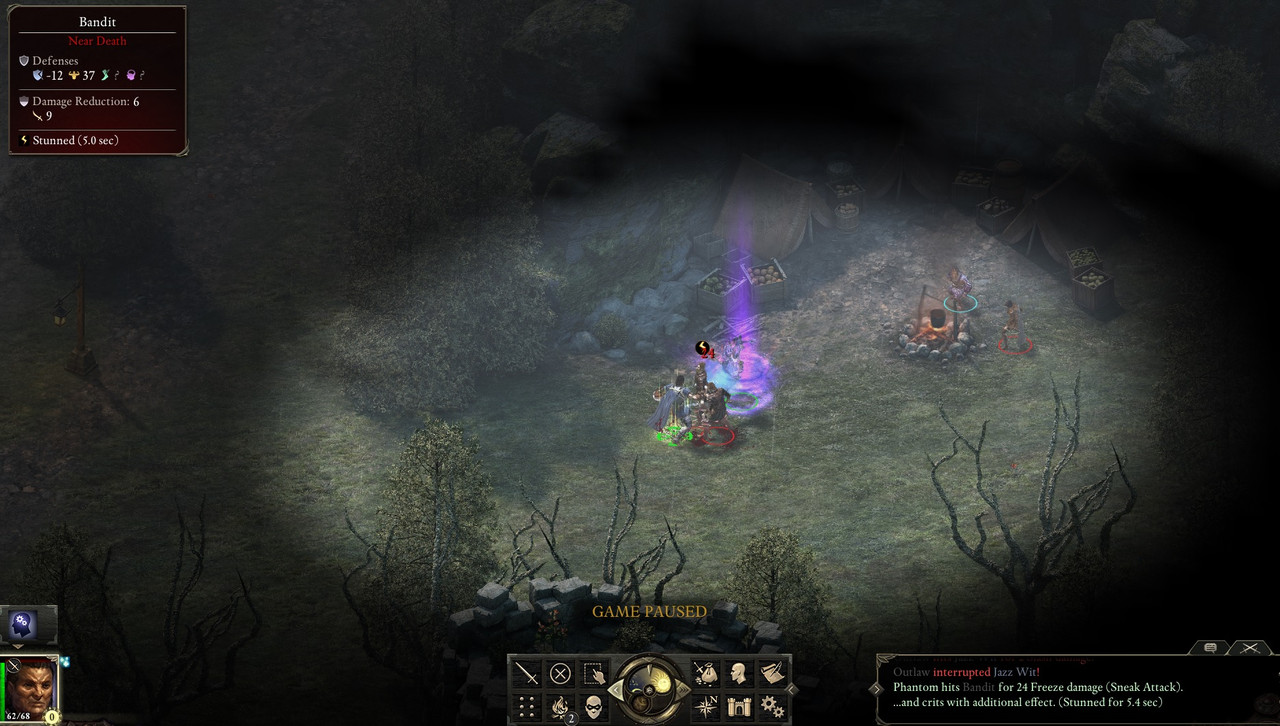
Onto the guls. These are much stronger versions of wichts and are genuinely dangerous in the early game because of numbers, fast attacks, and interrupt. I therefore drink a potion of Spirit Shield to boost my concentration and avoid being interrupt-locked.
As the first group is nearly defeated, I use my phantom to draw out the next group so I can fight them in the same combat phase and avoid losing my Spirit Shield.
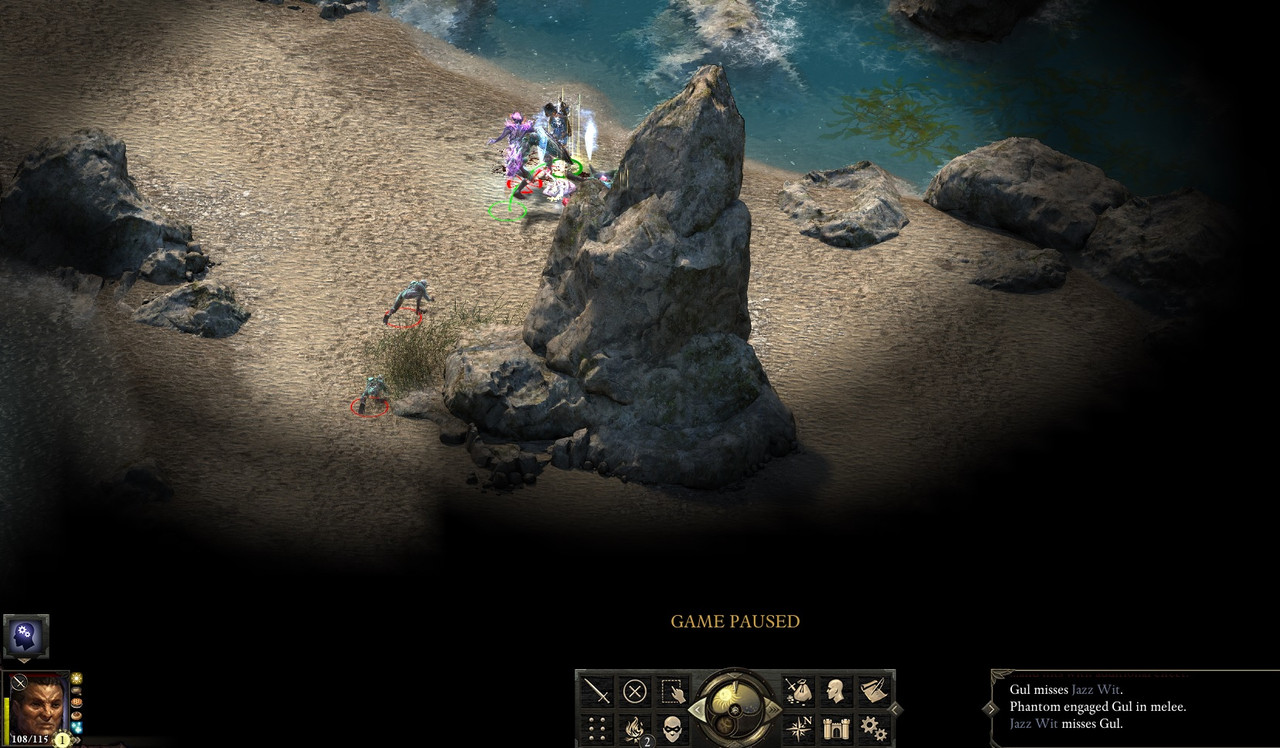
Hmm, may have bitten off a little more than I wanted to chew :/

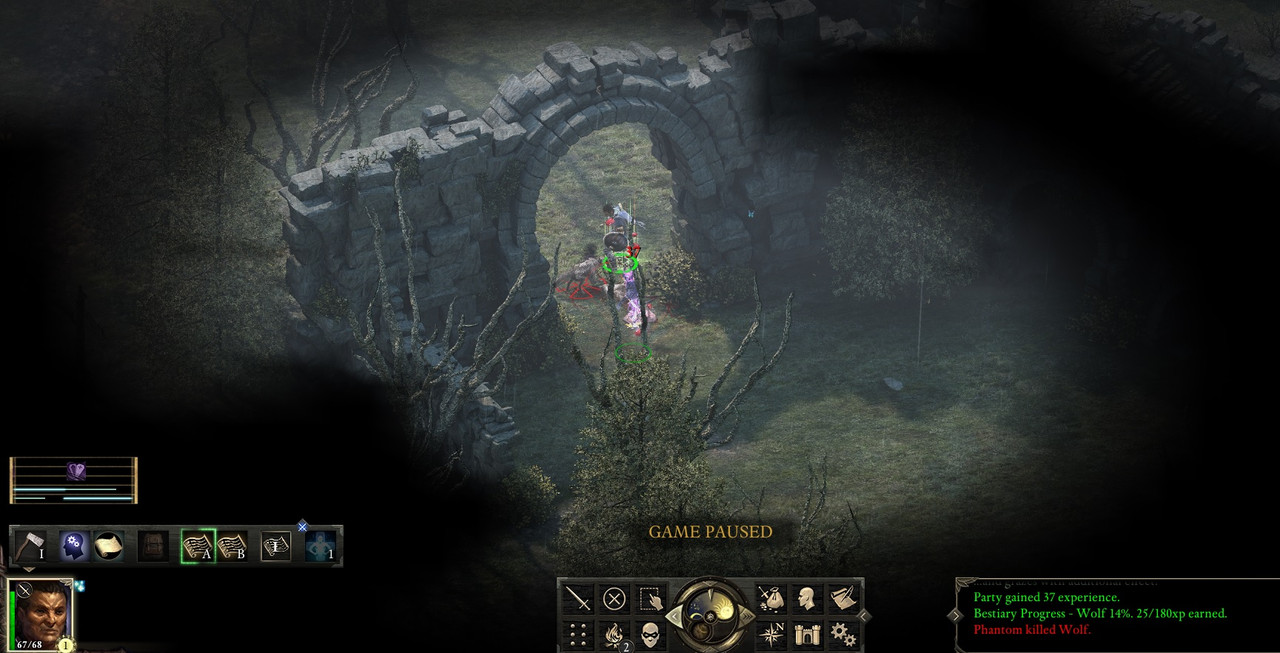
Still manage to win without too much trouble and I drink a potion of Ironskin in the next sea cave battle against the sporelings (since they hit quite hard).

With my health quite low and a number of potions consumed, I do not bother facing the rest of the cave and instead head back to Ranga to brew the potion and to rest by the fire.
Next stop is Madhmr Bridge where we complete the Ferry Flotsam task to get this beautiful item:
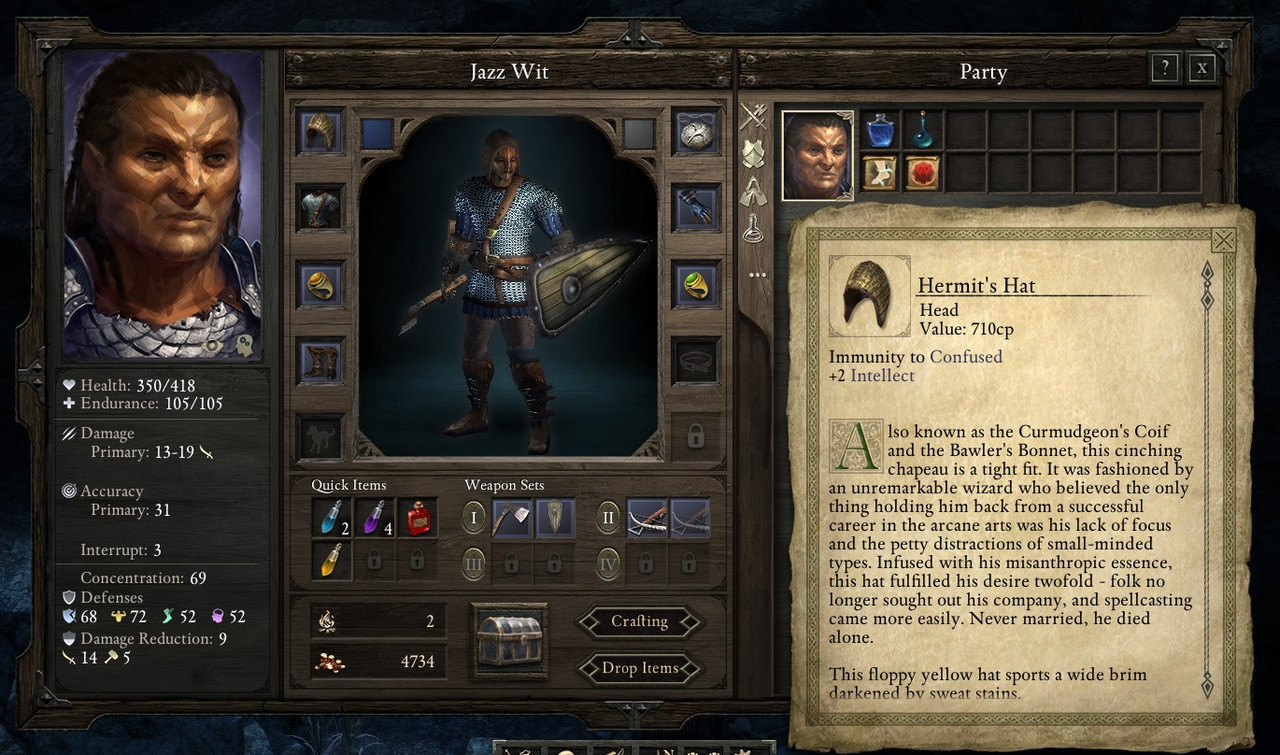
+2 INT is so sweet for my PC and the immunity to confusion avoids a lot of hassle (although confusion is usually not a particularly dangerous affliction for a solo character). Tis will be my headgear of choice for quite some time.
I then went to Esternwood for a bit of exploration on the way back to Gilded Vale, completed Aufra's quest, and bought some more food. Next time we will explore the Temple of Eothas.
-
4
-
-
No reason not to have two halls: one just for PoE, and another for the saga.
I don’t have PoE2 yet either (I imagine somebody will get it for me for xmas!). From what I understand it is plotwise a sequel, you can use same PC, but you start back at level 1 again. Not very satisfying IMO but we’ll see when I get it

-
2
-
-
Jazz Wit, Solo Coastal Aumaua Chanter (Hard), Part 3
Jazz Wit's newfound stealth skills are put to good use sneaking around Magran's Fork after he spots some wolves prowling around. The only wolves I fight are the ones harrassing the merchant. The rest are carefully avoided, as are the family of boars. I did fight the troll to get Fulvano's Amulet, swapping it in for the redundant minor cloak of protection. After chatting to Durance, Jazz Wit openly approaches a small group of people in the eastern part of the woods and is surprised when his greeting results in immediate attack.
This is a tough 3-on-1 fight where you can take a lot of damage. My first aim is to survive long enough to summon the phantom.

The phantom takes care of the paladins in short order but it's still a painful battle.

It's not quite as close run as it looks since I have some healing potions and would have drunk one if my health had got any lower. For winning this battle we get mail armour (slight upgrade on my starting breastplate) and a large shield (the first one you can get your hands on in-game).
I rested overnight in the abandoned house and set off for the Black Meadow at first light.
Breakfast of champions:

I sneak past most enemies in the Black Meadow but do fight this group of wichts.
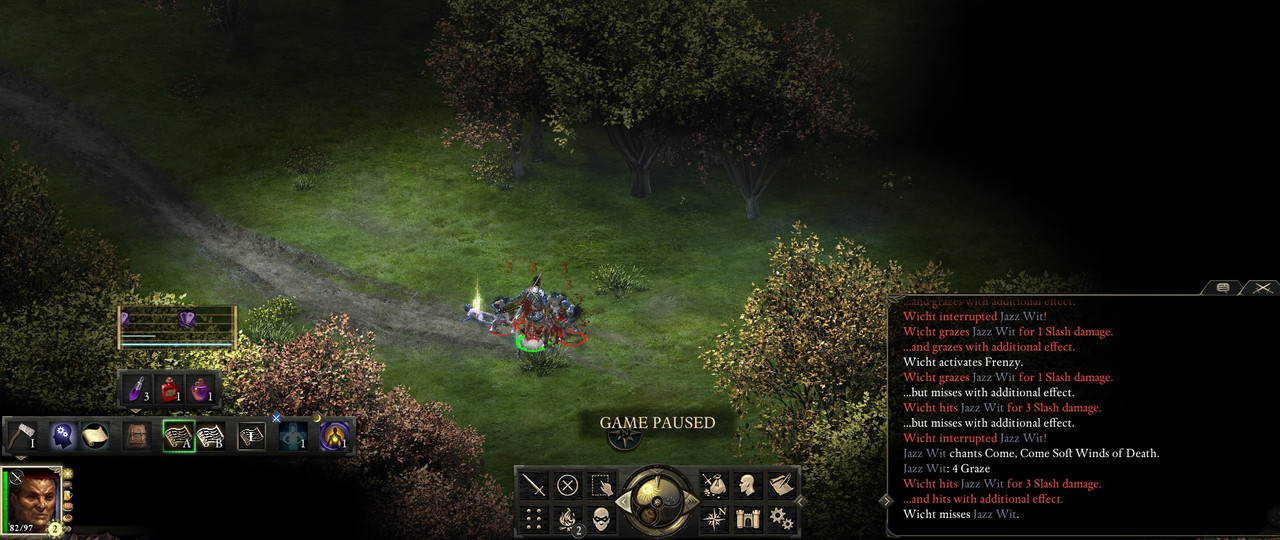
Wichts are dangerous because they come in large groups and can interrupt-lock you, but they have very lttle health and even a few seconds of Soft Winds soon kills them. Winning this fight gets us Fulvano's Boots.
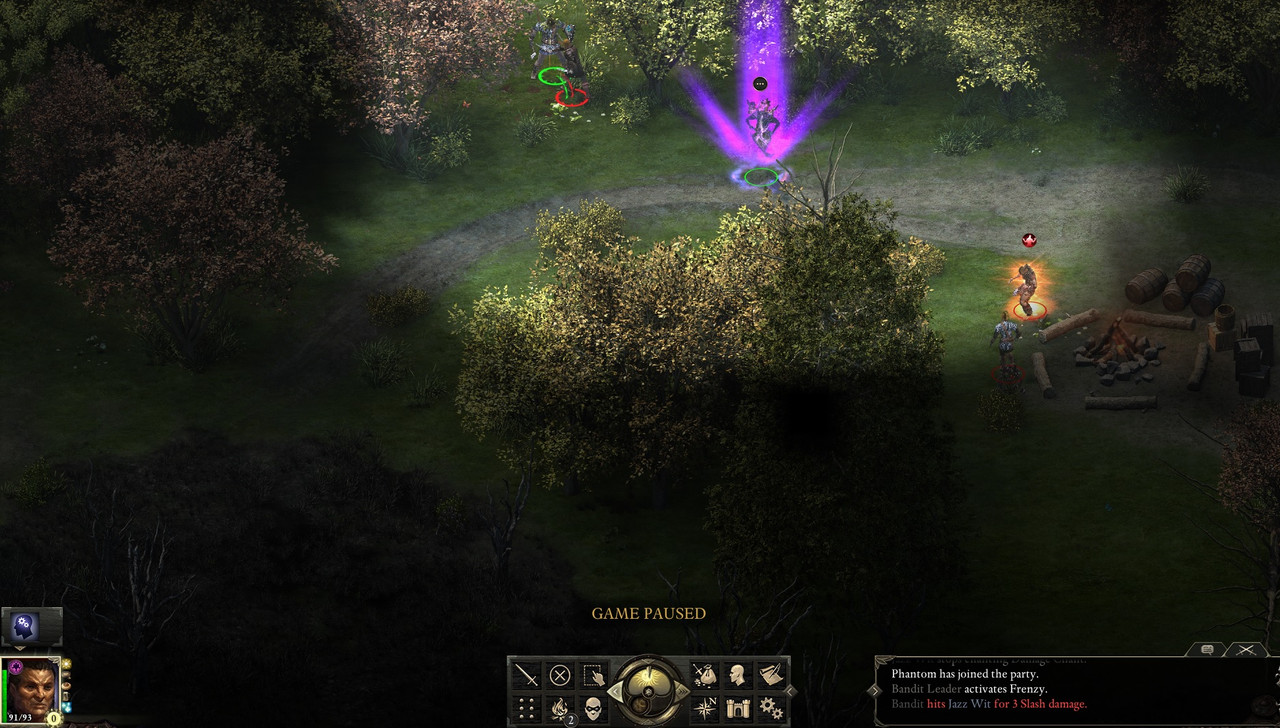
I locate the bandits and prepare an ambush of my own.

I summon a phantom to draw out the rest of the bandit camp.
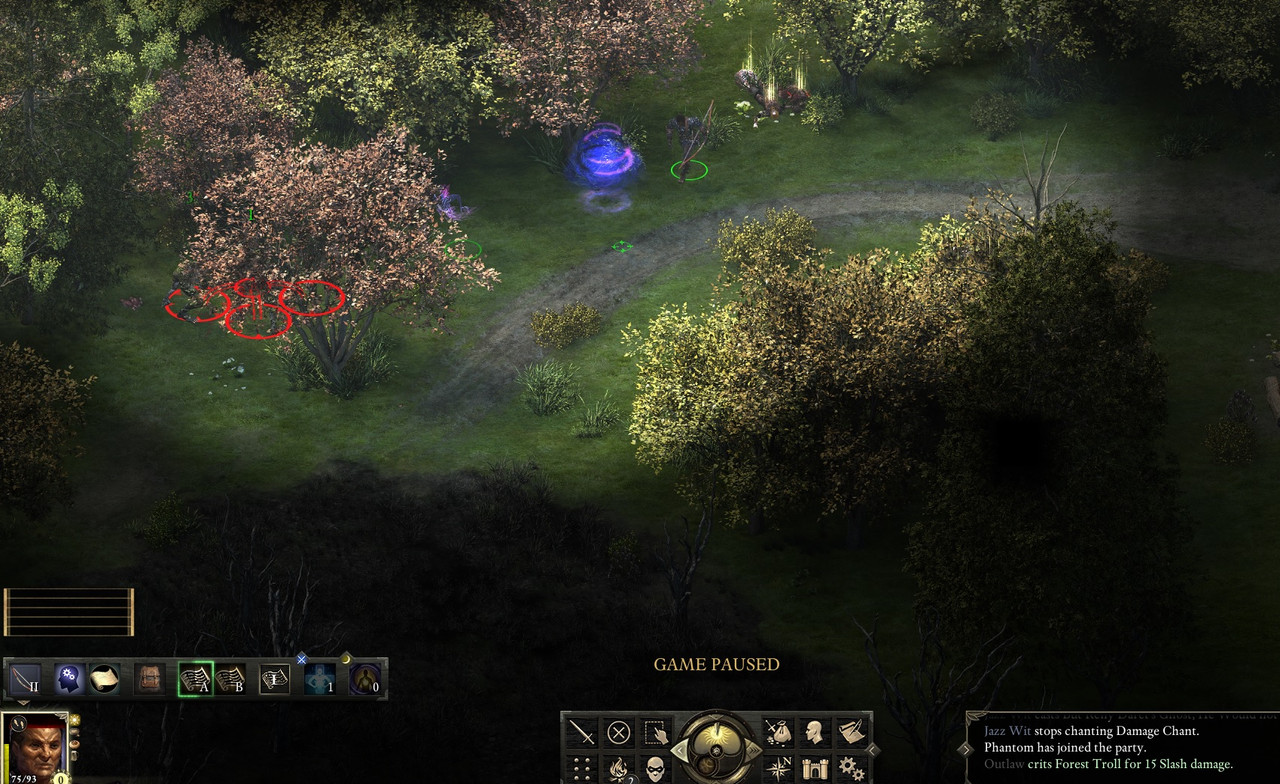
One of the bandits runs off to fight the nearby trolls; so we go after him once the rest are dead and add some trollskins to our collection.
I return to Gilded Vale to hand Tuatanu back his goods. Kolsc asks for our help against Raedric but I decide not to get involved. Instead I spend the evening at the Black Hound for some well-earned R&R.
In the morning I head back to Valewood and collect Fulvano's gloves to complete the accessories collection. Bear fight:

This can be a very dangerous fight and is a bit of a beginner's trap. The bear hits very hard, so I use Wizard's Double and Ironskin potions to take the edge off. The phantom ends the fight in short order as always.
Might as well clear the xaurips too since I have food buffs active:
I return to Gilded Vale and try to find Nonton. With no clear idea where to look I resort to knocking on doors, which leads us to Aufra and acceptance of her quest. Nonton meanwhile is in Ingroed's House. After hearing the lovers' side of the story, I let them go and get a minor ring of deflection (nice) and advancement to level 4.
I have 3 milestones for a solo Chanter. The first is reaching level 4; the second is reaching Defiance Bay; and the third is reaching level 9. The first is happily achieved
.Why is level 4 an important milestone? Well, these are my defences at level 3:
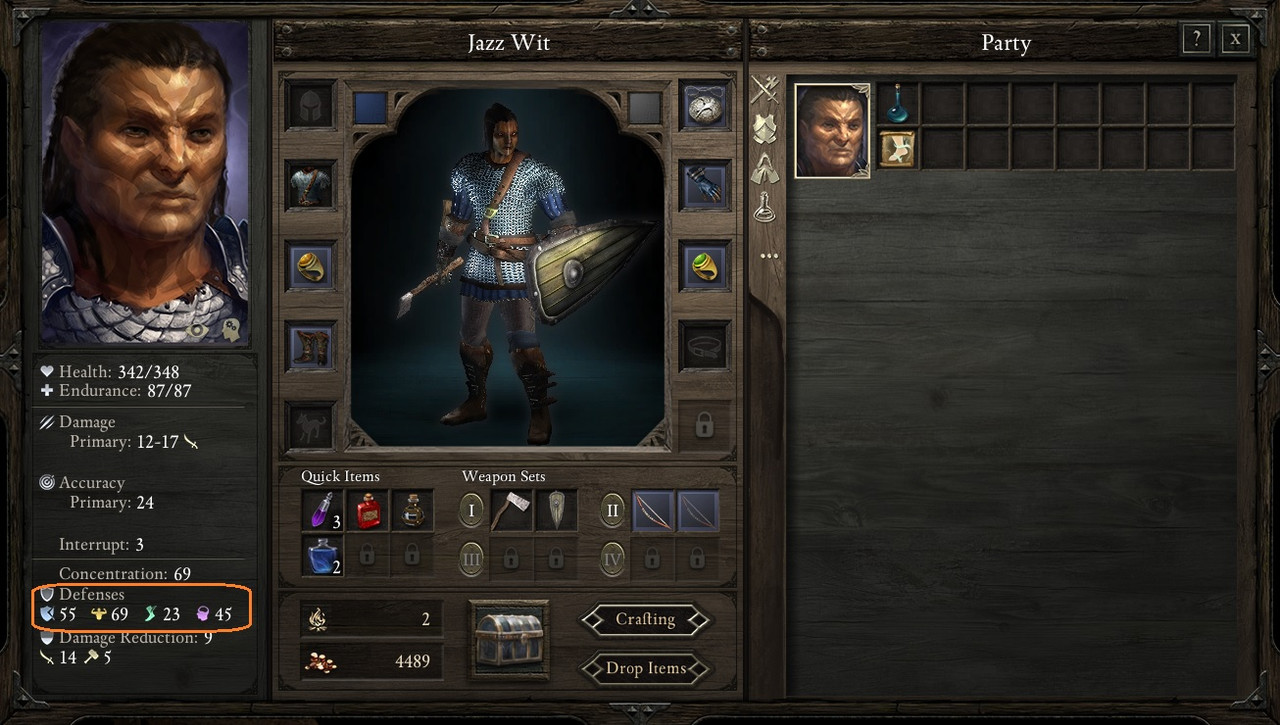
You can see my deflection is already pretty good and I am doing as much as possible to boost it (hatchet, large shield, minor ring of deflection). FOR is also strong, WIL average, REF a bit of a disaster. At level 4 I get my second talent, which is Weapon & Shield Style. This gives me +6 deflection when using a shield and also adds my entire shield deflection bonus to my REF defence. I can also now enchant my shield for another +4 bonus!
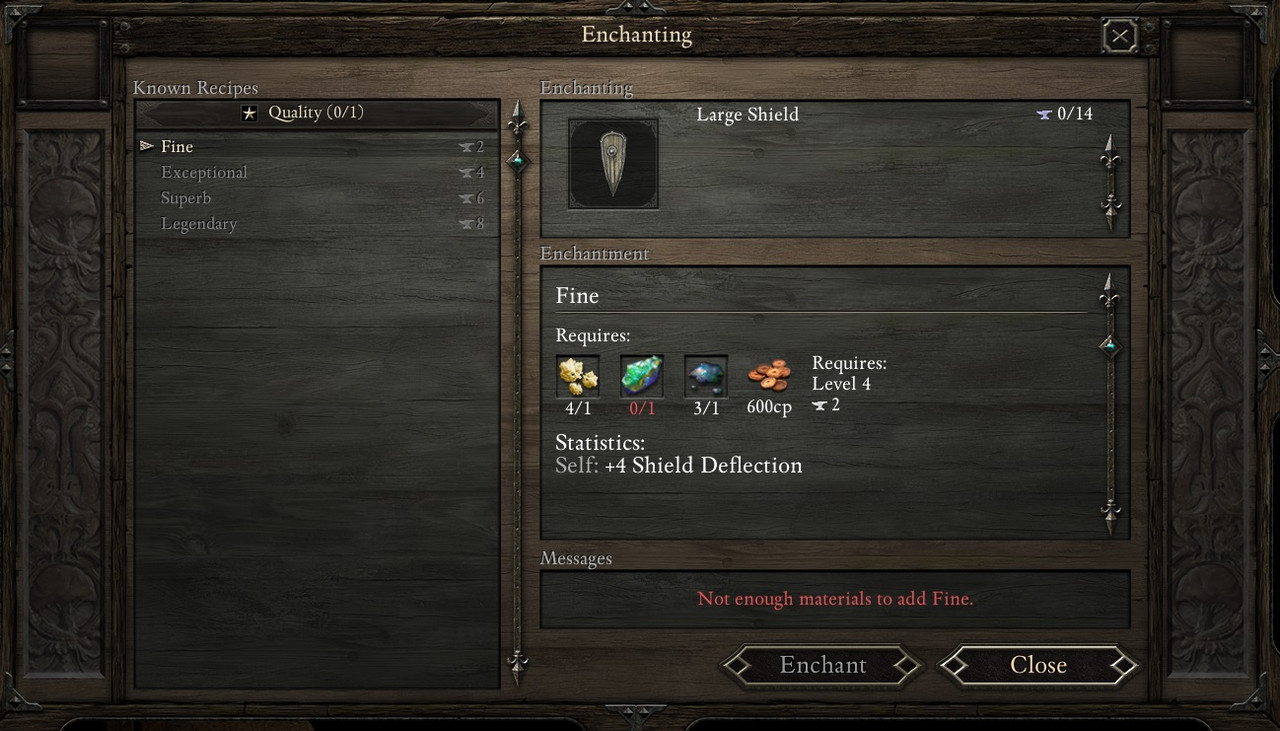
Whoops, no adra
I used it to craft the Ironskin potions. Never mind, we'll find some more. At level 4 I also increased my Lore to 4, Stealth to 4, and Survival to 1, and I took the Thunder Rolled invocation (which I will pretty much never use but I have no use for any of the other options either).New defences:

You can see my deflection has improved by 9 and once I enchant the shield it will actually be a 13 point improvement from advancing 1 level. That's about the biggest incremental level-on-level jump possible. My REF has improved by 25 (!) and that will be 29 after enchanting the shield. My survivability has just increased massively
.-
4
-
-
That's jolly bad luck if you are saying it has happened to you. I have never seen anything like that, how does a computer programme ever "forget" to calculate something correctly just because of workload? Do you have a screenshot or video? I assume you have discounted that it could be human error? So the arcane veil may have expired, or it was a gun attack, or the paralysed opponent had some kind of dispel or release effect applied etc?
-
1
-
-
Jazz Wit, Solo Coastal Aumaua Chanter (Hard), Part 2
I didn't get much chance to play this weekend so have made only a small amount of progress, going through Valewood and into Gilded Vale.
Bandit camp fight is over as soon as I can summon Reny Daret's Ghost.
Into the wolf lair and a little bit of positioning advice (not so important for this battle but conceptually important for tougher battles down the line). Take a look at this screenshot:

The two enemies engaging me are Young Wolves. Behind them is the main Wolf, but she can't reach me as she is blocked off by the pups. In this situation I do NOT want to kill the Young Wolves in a hurry: better to be engaged by them than the more dangerous adult Wolf. As such, as soon as I get one of the pups badly injured, I have switched my attack to the other pup. This way I can continue fighting the less dangerous opponents...
...and let the Phantom take care of the adult.
The point here is not just about Chanters and their summons. For any solo character you will come across situations in the game where you will face large groups of opponents. If you can engineer situations through positioning where only the weaker opponents are attacking you and the stronger ones are blocked off, that gives you time either to buff more before facing the toughies or to attack/weaken them from a distance.
My Mechanics score is high enough to auto-detect the hidden item under the wall.

I like to roleplay my PoE runs even when main intent is the challenge of no-reload. Therefore I choose dialogue options in line with how I imagine my character, make decisions in a similar vein, and I do not stealth to detect hidden items if it makes little sense to be in stealth at that time (e.g. in cities).
As it happens, I get a minor ring of protection which is useless to me given I already have minor cloak of protection (they do not stack). The item shuffler component of IE Mod means random treasures are truly random rather than dictated by the bizarre date conventions of the base game (which are manipulable when you know what appears when).
I carried on to Gilded Vale after exploring Valewood a bit, did the intro dialogue, completed the Tenfrith quest (progressing to level 3, increased Stealth to 3 and took the Reflex chant), advanced the main quest by resting and then talking to the hanged dwarf, and also completed the 'Against the Grain' task by persuading the bullies to back off. Next time we will head further south to Magran's Fork.
Quick glance at my chants.
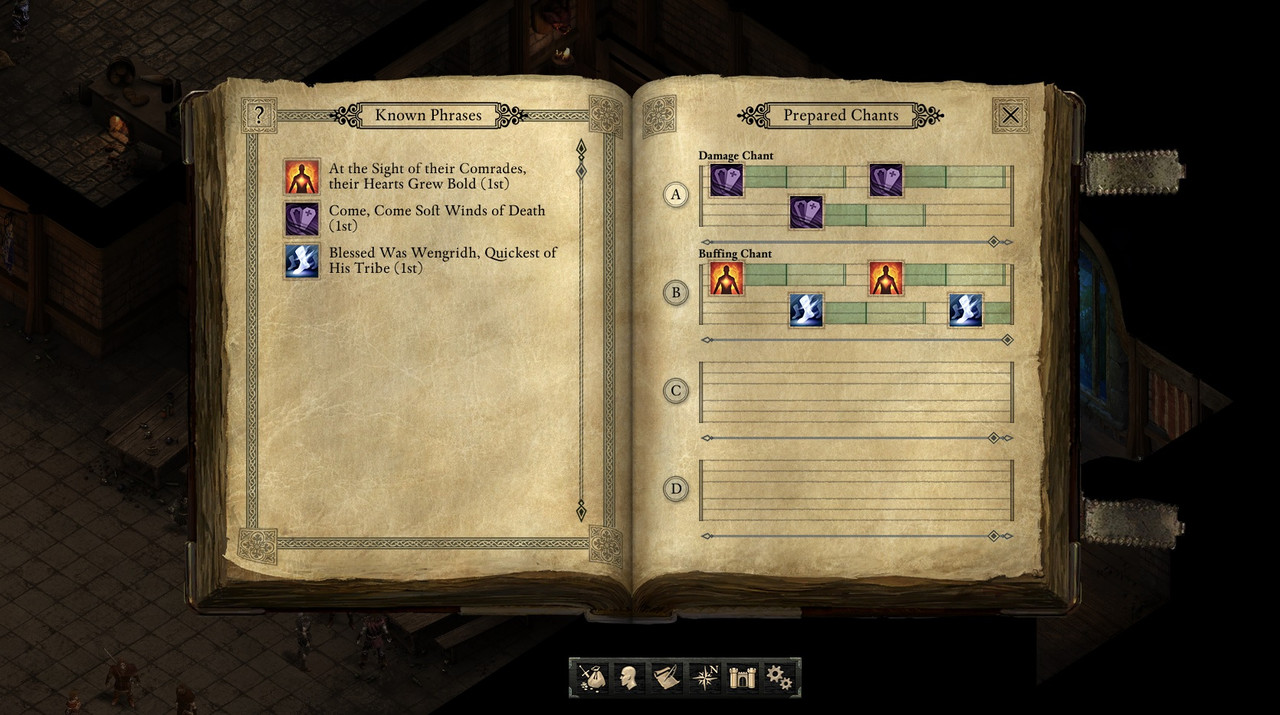
I have two chants set up: the damage chant (3 x Soft Winds) is what I have on as default. I also have a buffing chant set up for emergencies where I need higher defences, which alternates the FOR/WIL and REF chants. It is unlikely I will need this but you never know, and at least I have the option to switch (you cannot set up new chants while in combat).
-
6
-
-
I think either works, I normally just the same phrase 3 times in the chant (later 4/5 when you need more for invocation)
-
1
-
-
A wizard is one of the strongest classes and can absolutely be succesful. There’s a heavy reliance on spells though and getting certain combinations of spells cast quickly and succesfully, which is not everyone’s cup of tea because it requires 1) resting after every battle (at least for first half of game) and 2) risky. If you don’t get it right, margin for error is small. But if you can get through that, a high level mage is indeed a wonder to behold.
I am not sure about the concept of a kiting mage. It may work early game but when you start facing fights with 6+ opponents, you may not be able to run even if you have the speed to get away. Then there’s the disengagement damage and recovery is also slower when moving. I think more likely you have to stand and fight.
A wizard is well equipped to do this though. You have Arcane Veil as a talent (probably first pick) which you can later improve to Hardened Veil. This gives you a huge, undispellable deflection bonus against everything except guns. Trouble is it is just 2/rest and has a short 10 second base duration, so you will likely use both instances every fight. You activate this first thing in battle to buy you time to get Wizard’s Double/Spirit Shield et al up, and then you can go on the offensive.
-
2
-
-
Jazz Wit, Solo Coastal Aumaua Chanter (Hard), Part 1So I am ready to start my run and introduce my character ahead of some play this weekend
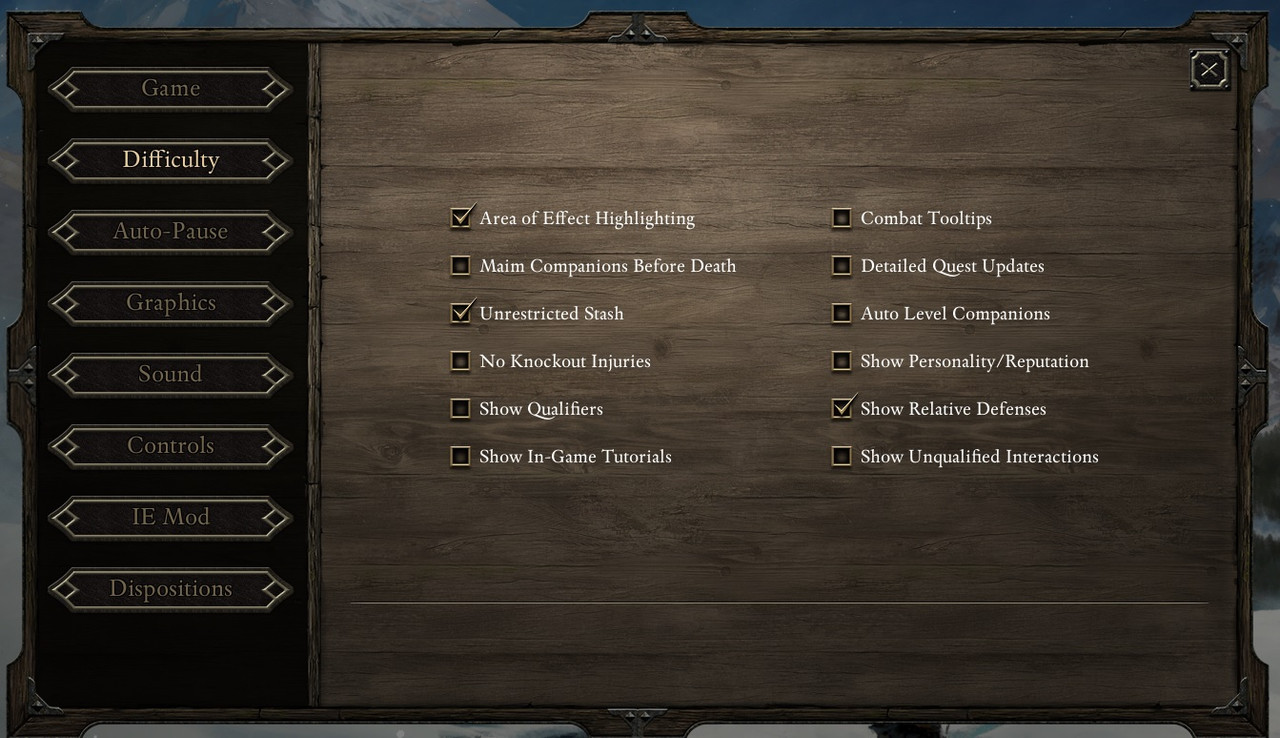
 This will be a solo run on Hard. I have two mods, IE mod (for loot shuffler and faster movement in stealth) and UP mod (for some bugfixes around DoT effects and the slightly faster potion drinking to alleviate the drinking bug). Neither has any drastic effect on gameplay (at least I have not selected any options in IE mod that would distort gameplay). More details on options selected are in these screenshots:
 The brave Jazz Wit:
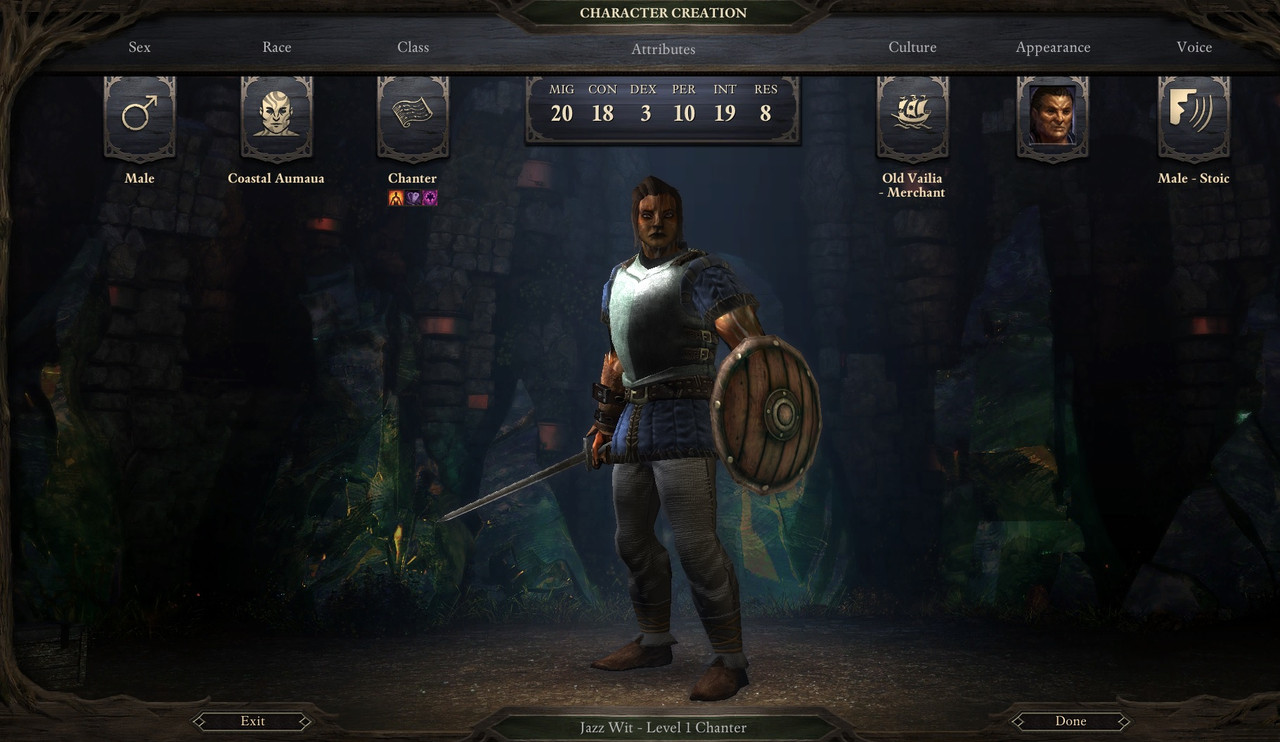 Max MIG, CON and INT, dumped DEX, RES is slightly below average. Built for survivability. I take the only chant and phrase that matter until level 9, 'Come, Come Soft Winds' (does small amount of AoE raw damage, stacks with itself) and 'By Reny Daret's Ghost' (summon Phantom). Merchant background for Mechanics and Lore, which will ultimately be the highest skills.Quick glance at the character sheet:
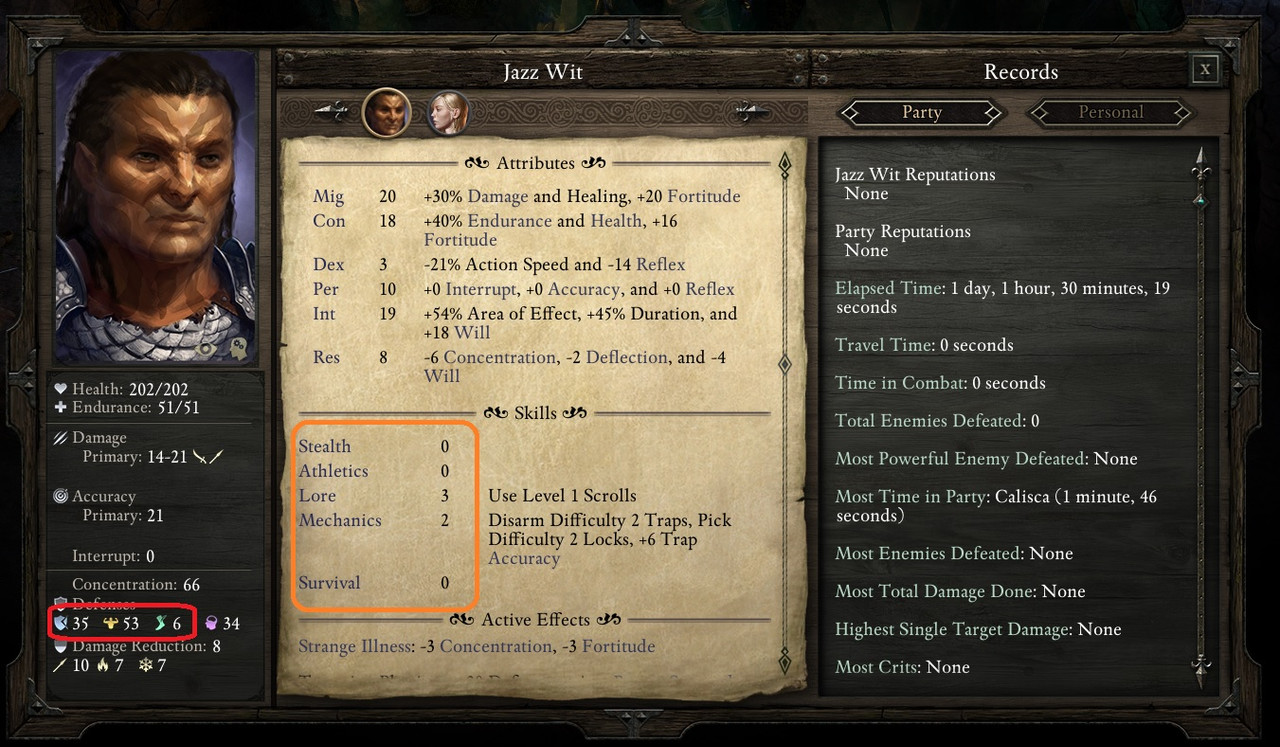 I have highlighted skills and defences. My aim for skill progression is to get to natural (before story bonuses) Athletics 1, Lore 7, Mechanics 13, Stealth 4, Survival 2. I have mapped out the skill points available and necessary to do this, so this is well planned in advance. Mechanics is for traps and caches, Lore is for scrolls, Stealth is sufficient to avoid a few fights here and there, Survival is enough for 20% healing bonus (and I can take the occasional Accuracy bonus by using an item to boost Survival before resting), and Athletics is irrelevant to me.As far as defences go, focus in early game will be to boost deflection. I will be using the biggest shield I can get without a care for what it does to Accuracy, enchanted as soon as possible, and talents that also boost deflection. You can see Fortitude is already very good (thanks to max MIG and CON) and this is the key defence I will be looking to maximise for survival. My Reflex defence is terrible due to dumped DEX, but will be alleviated by taking weapon & shield style at level 4. Will is (largely) irrelevant for solo.A couple of highlights from the camp.
 My very first attack roll is not only a crit, it is a roll of 100! That's a good omen.Fighting the raiders:
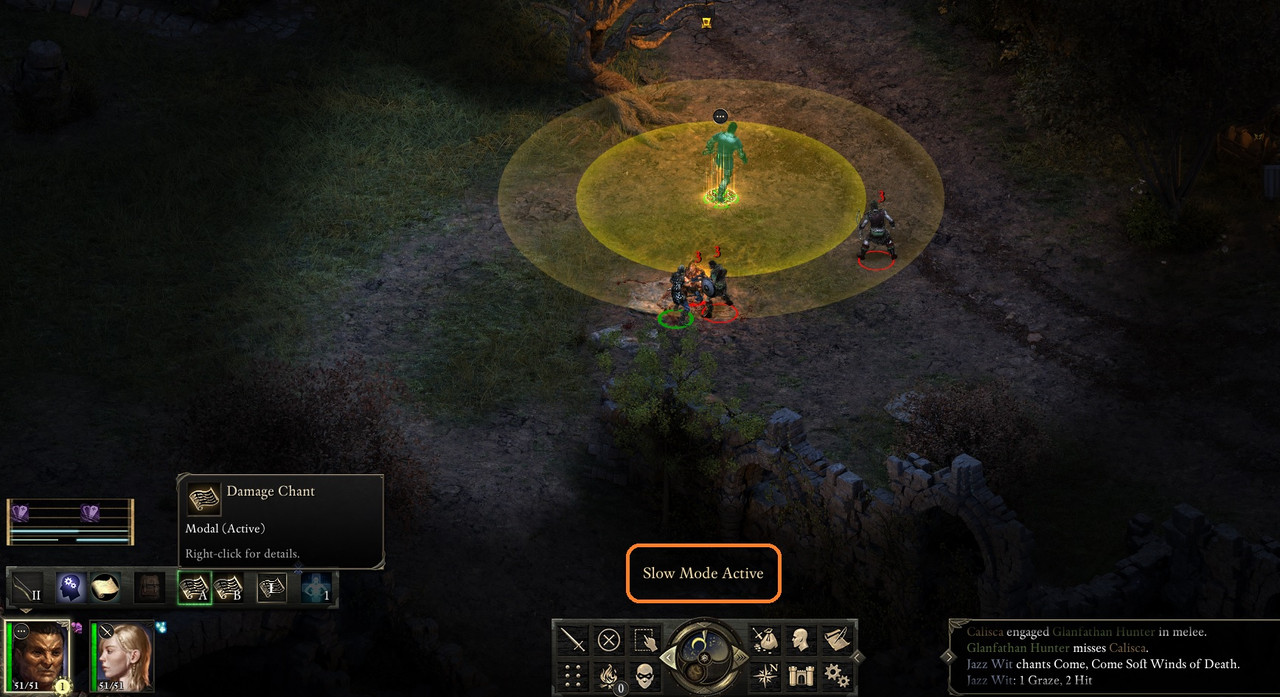 Two things to note here: firstly the positioning of my PC to get as many enemies as possible into the AoE of the chant. Note the lighter yellow part of the circle is the extended range of the chant due to my high INT score (without the high INT, I would not be affecting any of the opponents from this position). Secondly, slow mode is active. There is an option to activate slow-mode automatically at the start of combat. I highly recommend this option for all new players (and indeed veterans, I always still use it). Combat in PoE is fast and you cannot always tell what is happening. Slow it down to give yourself more of a chance to see what is happening. Later on once you are more confident, you an switch this option off if you like.Anyway, I completed the camp (roleplayed to select dialogue options that did not save Heodan) and the ruins of Cilant Lis. I reached level 2 at the machine and put all skill points into Mechanics (now 5), selected White Worms invocation and Veteran's Recovery as talent. This is an invaluable talent for solo and is my first pick for any class other than fighter or wizard. Jazz Wit is now alone and will remain so for the rest of the game, and I took my first rest in the ruins to get rid of the fatigue.Next session will be at the weekend. To end this one, I thought I would showcase a few crafting options that people who are considering solo should pay attention to.For any solo character, item use is an important part of the game. You do not have access to the range of skills and talents that a full party does so you have to find ways to plug the gaps. Items and consumables help you do this. For a Chanter in particular, this aspect of the game is one of the greatest strengths of the class. Because your chants are passive effects that take place independently of your combat actions, you can actually spend the time in combat using items rather than attacking or casting a spell. That is why this class is so strong defensively: when you never have to swing a sword, you have plenty of time to use items that improve your defences instead.Let's start with these 3 potions (and start making a note of the crafting ingredients):

 Wizard's Double is a very powerful effect for the first third/half of the game. The +40 deflection can last for the entire fight if you do not take a hit or critical hit (grazes do not dispel it), and the +40 deflection makes you hard to hit. Against opponents whose primary threat is physical attacks it is a great defensive resource. Note that any hit (which can be status effects against other defences) dispels Wizard's Double, so it will not be much use against opponents who attack your other defences. Mirrored Image is the next potion in this line, which gives you a smaller deflection bonus but which is only partially dispelled as you get hit (deflection bonus reduces by 5 for each hit). Llengrath's Displaced Image is the final and strongest potion in this line, with a large Reflex bonus as well as Deflection, it does not get dispelled on hit, and it lasts for a very long time.Once you can craft these potions in good numbers, you can and should use these in every non-trivial battle.The next potion is the most important of all and one of your quickslots should be permanently allocated to ensuring you have a full stack of these available in any fight:
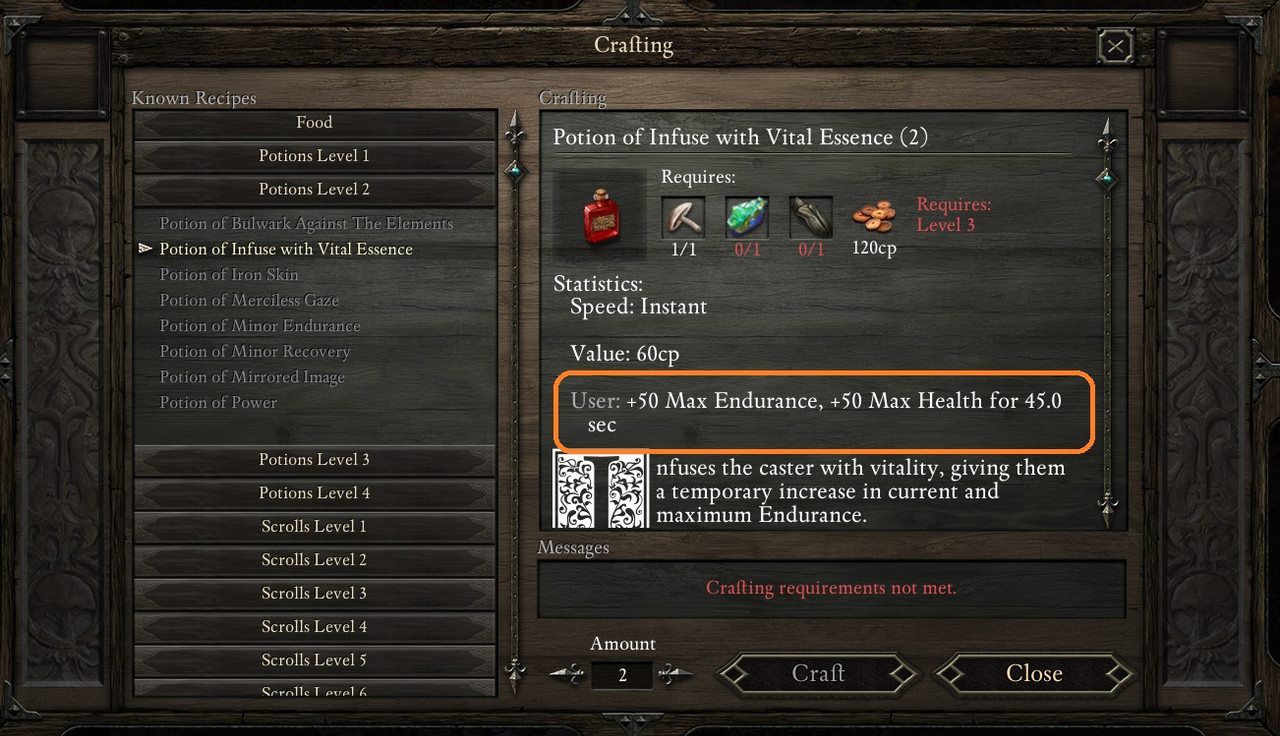 Moving onto scrolls. The following is a level 1 scroll that is nevertheless crucial to success:
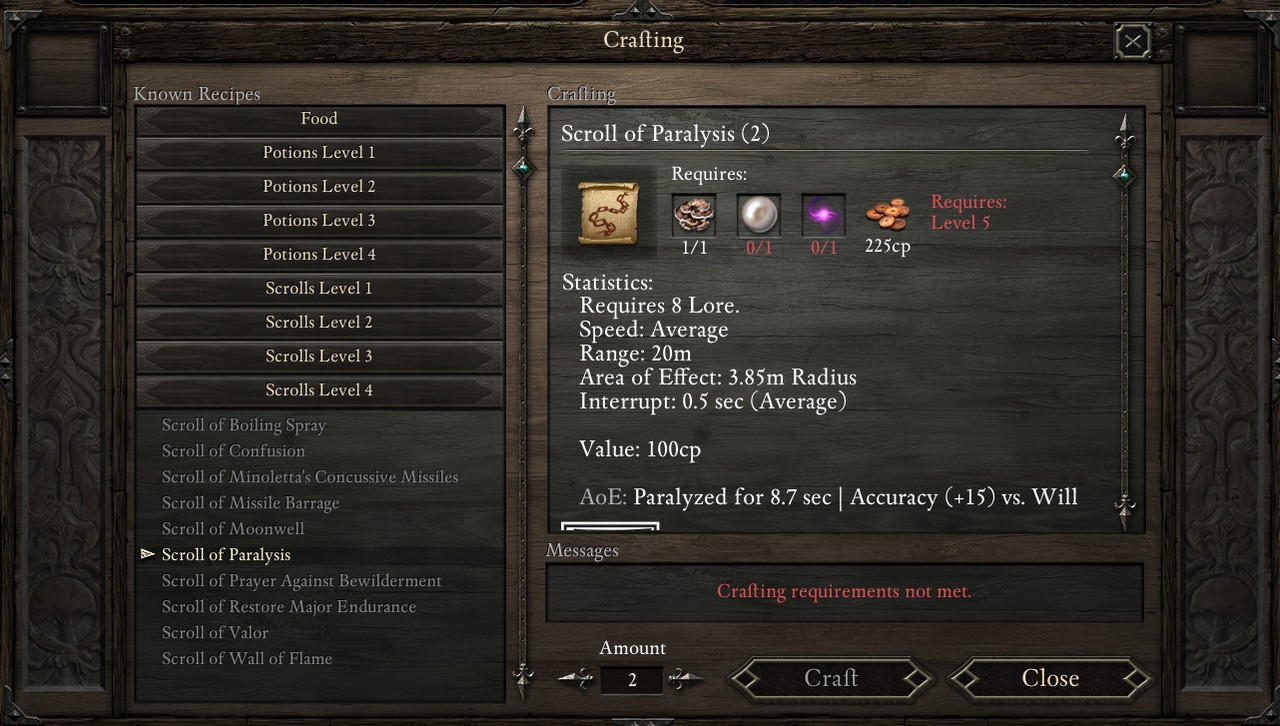
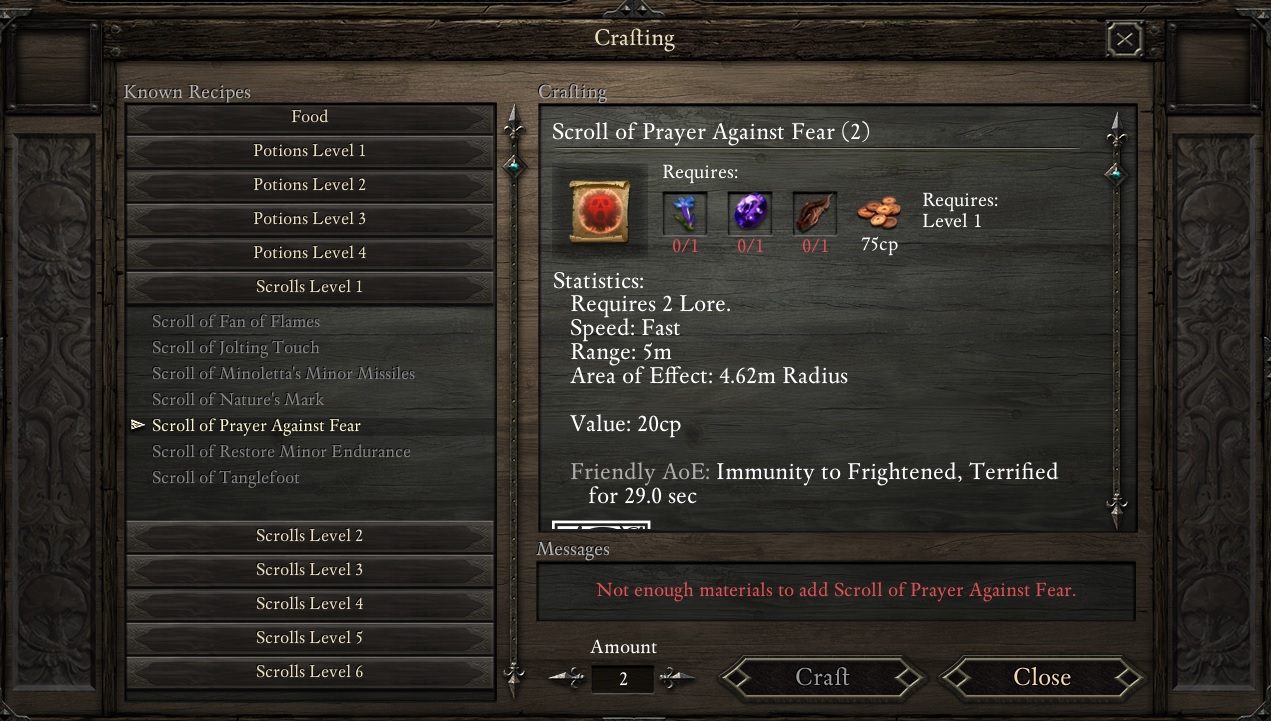 The reason it is so important is because fear effects impose very large Accuracy penalties in this game (among other things), so when under these effects you can soon find yourself unable to do anything to your opponent. And since opponents who cause fear can often do so infinitely (banshees, dragons et al), you could find yourself in a terminal situation where you cannot hurt the opponent and it is therefore just a matter of time until they defeat you. These scrolls are not the only way to deal with fear but are likely to be your most reliable avenue. Definitely have them available before facing opponents you know can cause fear.The following two level 2 scrolls are the meat and drink of solo no-reload. Craft them, use them, craft them, use them, over and over again, as often as you can, in every battle if needs be (get the picture)?
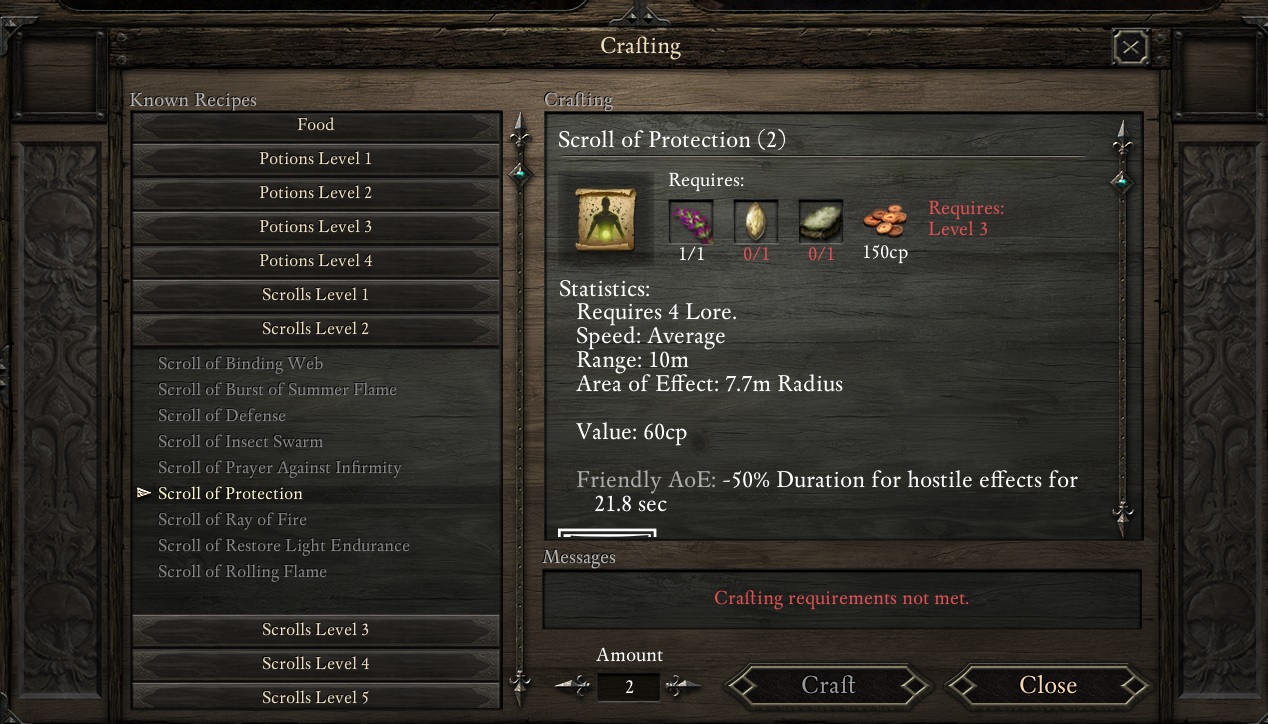 And this level 4 scroll is healing and defences rolled into one. I generally prefer to use Defence and Protection scrolls instead of this, but it comes into its own in situations where you cannot help take damage or where there is a risk you could be disabled for (shortish) periods.
 Also at level 4 are these two great disabling scrolls:
 Finally this is not a scroll you will need everyday but can be crucial in the toughest of battles:
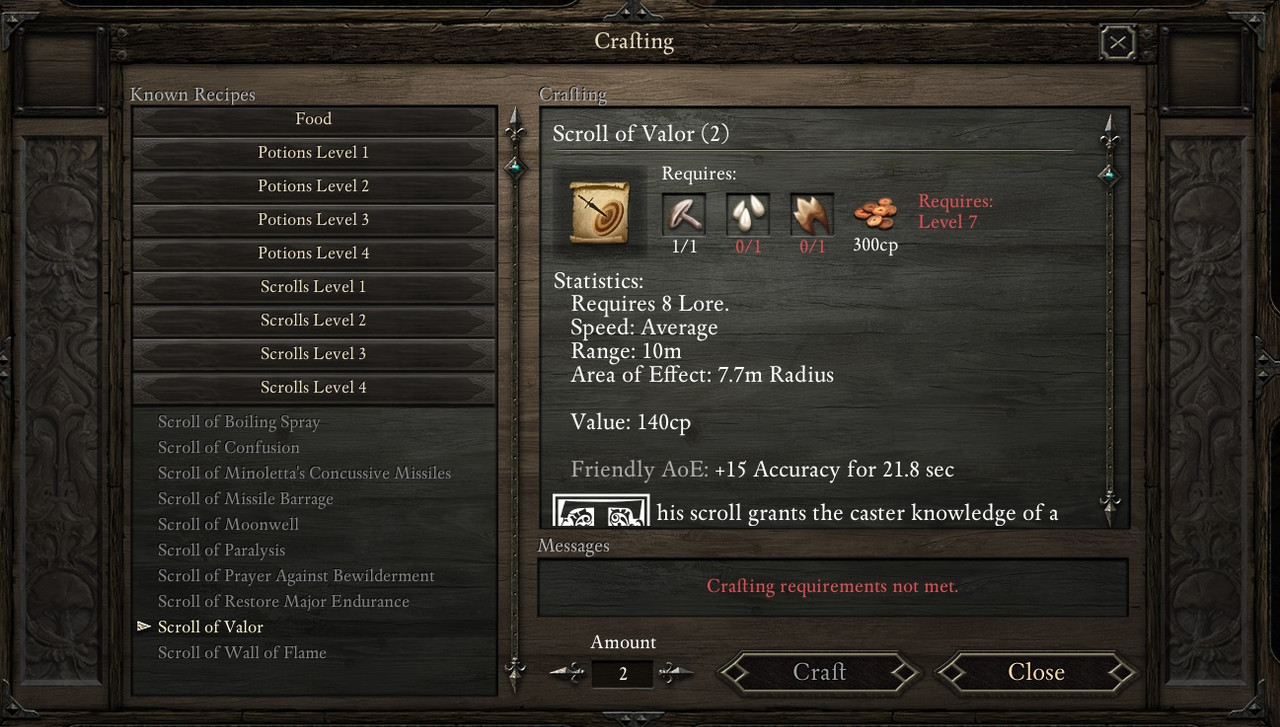 Couple of final things to sum up: note how so many of the really important consumables are defensive resources? Damage is cheap, defences save lives
 . And did you look at the crafting ingredients? Start collecting/buying Admeth's Wyrt, Skuldr Ears, and Dyrcap. A lot of the other crafting ingredients are widely available and you are unlikely to run out. But I can almost guarantee that if you really want to maximise consumable use, you will run out of these three ingredients because of how many important potions/scrolls require them. So if you see them, pick them up or put your hand in your pocket .
-
6
-
-
You want lore 8 for certain battles to use some of the really cool scrolls like Moonwell. But lore is quite easy to boost for the battles you need it, whether resting, rites or equipment with lore boost. So lore 4 in early game and lore 5/6 in late game, once you have Mechanics in double figures, is fine.
-
1
-
-
@Hulk'O'Saurus: How do you handle solo runs, and are they viable for no-reload purposes? Early game encounters in my experience tend to require heavy damage output and the ability to handle extreme pressure, and I'm not sure how a non-tanky class could survive in a no-reload run.
I think your perception about needing heavy damage output in early game is not correct. Enemies do not have much endurance, you don’t need heavy damage. You just need good defences to be able to handle their pressure.
By common consensus the two easiest solo classes are chanter and paladin. Both have pathetic damage output in early game. So why are they easiest? Because Paladin directly has best defences of all classes; and Chanter indirectly has best defences of the lot (because he never needs to swing a weapon and can use his actions to defend).
-
2
-
-
No excuse to die to traps! Put your skill points in Mechanics. Nothing else is essential, you don’t need Athletics at all, Survival 2 is plenty, Stealth 4 is fine, Lore 4 is fine. Mechanics all the way.
-
2
-
-
I echo sentiment around no-reload play. PoE is easy to succeed no-reload...with a party. This can be seen by people achieving it on a second or third playthrough with a week of experience. Who ever succeeded in a BG2 no-reload in a week?
Solo is different because the threat of a single mistake or unlucky roll leading to death becomes a factor again. Whereas with a party a priest or paladin can rescue a stricken character with an exhortation or withdraw, you can’t do that solo. Which means you are back to the customary solo maxim of prevention rather than cure. You need immunities/unbreakable defences/debuff reduction to succeed. And sometimes even that is not enough. I once had a character one-shot by a tail slap from the Adra Dragon. Extreme example I know but it was a HIT (not a crit) for something like 568 damage.
For a solo no-reload I think PoE is about as difficult as vanilla BG2/ToB. It is still somewhat easier than a BG2/ToB run with Ascension + SCS. Maybe on PotD and if you are doing a completionist run, it would be around an SCS/Ascension difficulty grade.
So very much achievable but needs a lot of planning, experience and understanding of mechanics to succeed.
-
2
-
-
PER is definitely a strong stat but since stat distribution is a zero-sum game it’s about what you are sacrificing in trying to max PER.
There are many ways to improve ACC other than through PER. Each additional level is +4 (+3 direct ACC improvement and +1 because spells/abilities get additional ACC bonus). You also have food/drugs/rest/camp bonuses, and then there are scrolls/spells such as Inspiring Radiance. High base PER would be on top of all this and make everything even better (because entire thresholds are moved between miss/graze/hit/crit). So if you can spare the points to max PER it’s absolutely a good investment. I don’t think it’s essential to max it because you can hit just fine though if you know what you are doing and how to prep for the toughest fights.
For value of PER vs INT for mages, feel free to experiment to see how it works for you (maybe you could get both!). You could potentially get as long a duration effect by hitting with high INT as you could by critting with high PER. And if you have both, great
-
4
-
-
I don’t want to go into spoiler territory for final battle. If you managed to do it (first time by the sounds of it) you will be fine on Normal with the benefit of experience behind you. You will have seen there is a lot of space for that battle, and that gives you tactical options. Also one of Thaos’ most fearsome abilities, Cleansing Flame, targets Deflection I think, so you can use that knowledge to force him to target your best protected character. The additional Accuracy Thaos will have at higher difficulty levels could be offset by additional buffs you did not yet use (e.g. did you use scroll of defence or Shields for the Faithful? Dragon meat food? Higher enchantments on shields? And every additional level gets you +3 as well, so there’s clearly huge scope).
-
2
-
-
The mercenaries area that semiticgod is referring to is a very high level area. To be fair your steward specifically warns you about it and flat out tells you that you can’t handle it yet if you are below level 10.
Fighting Sky Dragon at level 7 is very early. You must have missed quite a lot of quests to be so low level in Act 3.
White March 1 can be done around level 8 as long as you stick to main questline and don’t go wandering too much in a couple of the side areas. Generally I like to be 9+ though for safety. WM1 also inundates you with tons of supplies and equipment for not a lot of effort, so it can make the main questline easier afterwards.
Dyrford should be fine around level 8 as well. A lot of the fighting in those quests is avoidable.
-
4
-
-
Yes, but will be next weekend before I start. And it’s thanks to you guys for bringing this back to life and rekindling my interest in playing again!
-
3
-
-
It's actually great to be able to discuss the game and strategy properly with people, since these forums have been dead for ages (or everyone is onto PoE2).
And with all this talk I am going to have to get back into the action. It's probably 6 months+ since I last played so going to have to do a run just to refamiliarise myself and then try something with extreme challenge. Will probably do another run with solo chanter on Hard first off; last time I completed it I skipped White March as I was already max level and just wanted to succeed, this time I will try to do those as well. I will also voluntarily skip the deadfire items as they are just overpowered relative to the rest of the gear and the belt in particular is so addictive considering you can buy it in Act 1 and unlock all its powers by the time you get to Defiance Bay.
Once I've done this run I will either try it again on PotD or do one of the other classes I really want to succeed with (a long list but headed by Fighter or Barbarian with a 2 handed sword build).
-
3
-
-
Haha, yeah, when I first realised you could consume from that screen rather than put it in your quickslots, that really was a gamechanger for me as well. Stuff like that should be better documented, such as a tooltip / loading screen / in game wiki.
-
3
-
-
One other thing I wanted to mention for resting. You will notice that a lot of inn resting bonuses last for 2 rests (and later some of the stronghold ones for 3 rests). But if you have an inn resting bonus and then rest again at an inn with a resting bonus, the first bonus is replaced by the new bonus. In other words, inn resting bonuses do not stack.
However...inn resting bonuses do stack with camping bonuses (and that is what the "lasts for 2 rests" dynamic is for). So for maximum bonuses, you should alternately rest at an inn and then camping (or rest at an inn, and then immediately go somewhere to camp if you want to have both sets always).
Later you can also get boons from the Salty Mast's employees but only for the PC. These only last until your next rest. So perfect order is inn/camp/Salty Mast. It's not very realistic to be traipsing across maps like this but if you are only thinking max power rather than good roleplay, this lets you stack a load of beneficial effects.
-
2
-
-
You absolutely should not be stingy with resources or per rest abilities. There are lots of camping supplies so resting is hardly restricted. There is no fatigue either from travel or time, only from scripted encounters. You can literally travel across the map to rest if you like a particular resting bonus.
Btw I consider DEX to be the least important stat. The only characters where you want average/decent DEX are casters. I'm perfectly fine with DEX 3 on any tank type. Additional action speed is for maximising DPS. But for no-reload, you should never forget the adage learned from BG runs: defence is a thousand times more important than offence. Besides, in-game DEX is likely to be semi-permanently 4-5 points better than base DEX (equipment/rest/food), so even DEX 3 is really DEX 7-8, and that has only a small speed penalty.
I have a personal theory on stats: DEX & PER are purely offensive attributes (more speed and accuracy). CON & RES are purely defensive attributes (more HPs and deflection/concentration). MIG & INT are the two stats that affect both (more damage AND healing from MIG, greater AoE and duration for both offensive and defensive effects from INT).
So MIG & INT are the two stats I value the most. The other stats depend on the role of the character. Tanks can dump DEX and therefore have two average and one maxed stat out of CON/PER/RES (CON is the obvious one to max, average PER and RES). Casters want a more balanced distribution and backline characters can get away with below average CON & RES in favour of DEX/PER.
-
4
-
-
Your health problems are easily fixable with Infuse with Vital Essence potions. You should have plenty of ingredients to craft those now.
-
2
-
-
As far as defences go, deflection is only the most important in the first third of the game. It is still important after that in the sense of you don’t want to get swarmed/flanked/interrupted to death but generally once you are level 6/7 and have decent END, equipment and supplies, you can take a few weapon hits without too much bother. So the other defences become more important.
Fortitude is the most important defence by some distance. Simple reason: the effects that attack fortitude are the ones that get you killed: stun/prone/petrify etc. You might think that you can ride out a few seconds of stun but it ain’t that easy. You can get ripped apart in those few seconds and you also have to remember that if an opponent can stun you once, theyvan probably do it again, so you are risking a chainlock of stun if the first one gets you.
Will is quite important in party play but can be virtually ignored for solo. It’s not fun having your tank charmed: not only does he/she turn on you, but all the enemies that were attacking your tank are now attacking the rest of your party.
Reflex is possibly least important of the defences though you still want to boost it as much as you can. Generally effects that target reflex are either damage effects or some non-disabling status effects, so they can be ridden out.
Because of the way defences improve over levels and a lot of equipment boosts all/multiple defences, the main variation in defences comes from stats or spells. So if you want to boost Fortitude, you generally do it by improving MIG and CON (resting bonus/boons/food/drugs etc).
Another way of indirectly boosting all your defences is to use a scroll of protection or potions of recovery (yellow potions). These have to be used proactively (before status effects hit you, so at the start of fights) and they then halve or otherwise shorten how long afflictions apply for. The scroll on particular is great as it is AoE, good duration and can protect whole party.
-
5
-
-
Raedric’s Hold will get you tons of loot but no more level ups. Level 4 is as good as it gets for Caed Nua.
Money will soon become a non-issue so no worries with purchasing what you want. Just bear in mind that stuff like minor rings of x and capes of withdrawal will soon become useless and/or plentiful.
If you are not already, start eating like a glutton. Food is so cheap and you should buy inns out of their stock of the good stuff (it will replenish the next day). Really there is no excuse for all party members not to be under the effect of at least 2 foodstuffs (MIG/CON/DEX enhancing is already available from Black Hound) AT ALL TIMES. Yes I’m serious. And washed down with some ale. And later some drugs thrown in as well. These are essentially the only prebuffs available in PoE, so make use of them.
-
5
-


 . And did you look at the crafting ingredients? Start collecting/buying Admeth's Wyrt, Skuldr Ears, and Dyrcap. A lot of the other crafting ingredients are widely available and you are unlikely to run out. But I can almost guarantee that if you really want to maximise consumable use, you will run out of these three ingredients because of how many important potions/scrolls require them. So if you see them, pick them up or put your hand in your pocket
The Pillars of Eternity No Reload Challenge
in Pillars of Eternity: Characters Builds, Strategies & the Unity Engine (Spoiler Warning!)
Posted
PS Rogues are quite bad, one-trick ponies. I generally love playing Rogues in other games but they are badly implemented in PoE. The idea of solo rogue with firearms + shadowing beyond to assassinate enemies does not work because 1) you only get 2/rest and 2) combat ends if the enemies cannot see any character, at which point their endurance heals.